DIY Burp Cloths
Hello. I'm Sybra and I like to DIY. Or rather, for grammar's sake, DIMyself.
I like fun things, but I don't like to spend a lot of money. I have found making things myself can save money and add a little style to my life.

Once I found out I was pregnant, a whole new realm of DIY opened up to me. I now could make baby things all day! Well, I have a job, so I could make things on weekends.
I found one thing that every parent needs and is super easy to make yourself- cute burp cloths! After looking through a couple of blogs through Pinterest, I found that it wouldn't be difficult to take some cloth diapers (what my mom used as burp cloths) and make them a little bit cuter. The best thing is that they are great practice for sewing because they don't have to be perfect- they are just going to be used to wipe spit-up!
Before I start, I will say that regular cotton fabric is not the most absorbent until it is washed a million times, but I found it didn't matter. Putting a little fabric on one side made it really helpful to keep track of the wet side of the burp cloth. It saved many shirts and shoulders from getting messy! We just had to remember to keep the cute side down. Other fabrics, like flannel and terry cloth are absorbent, but we still found it helpful to keep the fabric side down.
Now, on to the DIY!
Start with some plain cloth diapers. These ones are more gauze like, which snags more while sewing than the other kind. I had already sewn the "better" ones, so I was stuck with these!

Wash and iron the cloth diapers. They don't have to be perfect!

Wash and iron your fabric. Pre-washing your fabric gets rid of the shrinking problem- you don't want your cloth diaper or cute fabric to shrink in the washer/dryer after you sew them together.

Fold the cloth diaper down to the area you want covered with the fabric. I usually fold my burp cloths in thirds along the seams, so that's how I folded this one. To make it easy on myself (I have measuring fabric) I just laid the folded diaper right down on my fabric and cut around it, leaving room to fold over the edges.

This step I found SUPER helpful- iron the seams. This way you don't have to use as many pins, and you don't have to be as careful sewing. Once again, I hate measuring fabric, so I just eye-balled it. It doesn't have to be perfect!

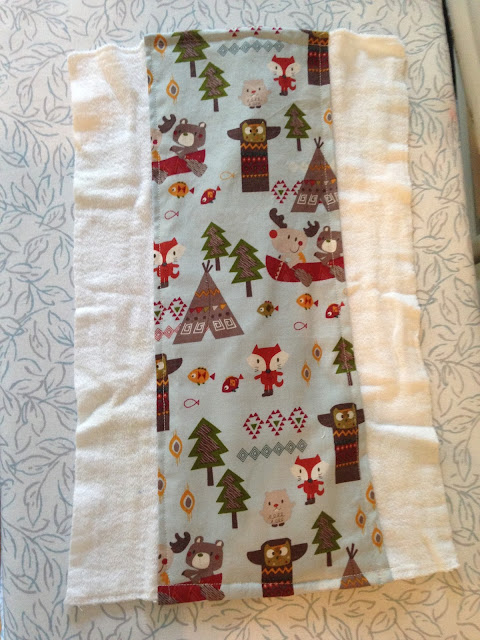
After ironing your edges, pin the fabric to the cloth diaper. I like to fold the ends over to the back of the diaper to give it a more finished look. If your fabric is shorter, just sew the whole thing on one side.

Sew along the edges. The closer to the edge, the less it will stick up from the cloth diaper. If you have folded fabric over to the back on the edges, I recommend sewing the back side so you know where the fabric ends.

You're done!
I wanted to mix it up a little, so I used a smaller scrap of fabric on the bottom of a cloth diaper. It was a little bit trickier to fold in the sides of the fabric, but I just folded and folded until it looked okay. I ended up cutting a little slit where it folded over and then letting it hang off all of the sides a little bit.

Sew around the four sides. It doesn't have to be perfect!

It's done!

I also had some left over flannel, which is absorbent, so I took a scrap of some cotton fabric and decided to make a mini burp cloth for the diaper bag. It never hurts to have a few extra ones in there! I laid the two pieces of fabric on top of each other, the good sides touching.

I cut the larger piece to match the smaller piece. Pin them together around each side. It doesn't have to be perfect!

Sew three sides fully, and partially sew the fourth side (see the pins still in?) so you can flip the fabric inside out. You can barely see it, but I sewed straight from the shortest side of the fabric.

I trimmed around the seams to have more of a rectangle. It doesn't have to be perfect! (Notice a trend here?)

Flip it inside out through the whole.

You will have nice edges, but if you're like me and didn't measure (or sew straight) your corners will be different sizes. I don't mind because (you guessed it) it doesn't have to be perfect!

Pick a fun design on your sewing machine and sew around the edges again.

I chose this uneven zig-zag because it looks like a dinosaur bite! On my forest friends fabric, I used one that had a leaf in the design.

What fun burp cloths!

I like fun things, but I don't like to spend a lot of money. I have found making things myself can save money and add a little style to my life.

Once I found out I was pregnant, a whole new realm of DIY opened up to me. I now could make baby things all day! Well, I have a job, so I could make things on weekends.
I found one thing that every parent needs and is super easy to make yourself- cute burp cloths! After looking through a couple of blogs through Pinterest, I found that it wouldn't be difficult to take some cloth diapers (what my mom used as burp cloths) and make them a little bit cuter. The best thing is that they are great practice for sewing because they don't have to be perfect- they are just going to be used to wipe spit-up!
Before I start, I will say that regular cotton fabric is not the most absorbent until it is washed a million times, but I found it didn't matter. Putting a little fabric on one side made it really helpful to keep track of the wet side of the burp cloth. It saved many shirts and shoulders from getting messy! We just had to remember to keep the cute side down. Other fabrics, like flannel and terry cloth are absorbent, but we still found it helpful to keep the fabric side down.
Now, on to the DIY!
Start with some plain cloth diapers. These ones are more gauze like, which snags more while sewing than the other kind. I had already sewn the "better" ones, so I was stuck with these!

Wash and iron the cloth diapers. They don't have to be perfect!

Wash and iron your fabric. Pre-washing your fabric gets rid of the shrinking problem- you don't want your cloth diaper or cute fabric to shrink in the washer/dryer after you sew them together.

Fold the cloth diaper down to the area you want covered with the fabric. I usually fold my burp cloths in thirds along the seams, so that's how I folded this one. To make it easy on myself (I have measuring fabric) I just laid the folded diaper right down on my fabric and cut around it, leaving room to fold over the edges.

This step I found SUPER helpful- iron the seams. This way you don't have to use as many pins, and you don't have to be as careful sewing. Once again, I hate measuring fabric, so I just eye-balled it. It doesn't have to be perfect!

After ironing your edges, pin the fabric to the cloth diaper. I like to fold the ends over to the back of the diaper to give it a more finished look. If your fabric is shorter, just sew the whole thing on one side.

Sew along the edges. The closer to the edge, the less it will stick up from the cloth diaper. If you have folded fabric over to the back on the edges, I recommend sewing the back side so you know where the fabric ends.

You're done!

I wanted to mix it up a little, so I used a smaller scrap of fabric on the bottom of a cloth diaper. It was a little bit trickier to fold in the sides of the fabric, but I just folded and folded until it looked okay. I ended up cutting a little slit where it folded over and then letting it hang off all of the sides a little bit.

Sew around the four sides. It doesn't have to be perfect!

It's done!

I also had some left over flannel, which is absorbent, so I took a scrap of some cotton fabric and decided to make a mini burp cloth for the diaper bag. It never hurts to have a few extra ones in there! I laid the two pieces of fabric on top of each other, the good sides touching.

I cut the larger piece to match the smaller piece. Pin them together around each side. It doesn't have to be perfect!

Sew three sides fully, and partially sew the fourth side (see the pins still in?) so you can flip the fabric inside out. You can barely see it, but I sewed straight from the shortest side of the fabric.

I trimmed around the seams to have more of a rectangle. It doesn't have to be perfect! (Notice a trend here?)

Flip it inside out through the whole.

You will have nice edges, but if you're like me and didn't measure (or sew straight) your corners will be different sizes. I don't mind because (you guessed it) it doesn't have to be perfect!

Pick a fun design on your sewing machine and sew around the edges again.

I chose this uneven zig-zag because it looks like a dinosaur bite! On my forest friends fabric, I used one that had a leaf in the design.

What fun burp cloths!


Very nice Sybra!
ReplyDelete